

Hello! The goal of this post is to show you step-by-step details on how to create a basic WordPress plugin that is super simple, yet fully-functional. This can be a boilerplate or a starting point for all your plugin-creation journey! Anyone with a basic knowledge of PHP, Javascript and CSS should be able to do this. By the end of this post, you will have created a custom plugin for WordPress with these functionalities:
- An options page in the admin panel that allows you to save some settings or content to the WordPress database.
- A shortcode that allows you to display the content saved in the WordPress database, or otherwise some predefined default text.
- A way to add or enqueue (WordPress terminology) your plugin’s Javascript and CSS.
We will also test our plugin after the coding is done. Let’s start!
Step 1 : Create the plugin folder and files:
- On your computer, create a new folder. Let’s call it “my-plugin”. You will be putting all your code files in this folder. This folder will be uploaded to your WordPress’ plugin folder when you are done. More on this later.
- Inside the “my-plugin” folder, create the following files:
my-plugin.php: Main plugin file.admin/options-page.php: Admin options page template.includes/scripts.php: Contains functions to enqueue scripts and styles.includes/shortcodes.php: Contains shortcode functions.includes/css/style.css:Contains the style for your shortcode output.
Step 2 : Plugin activation and deactivation hooks (my-plugin.php):
- In the “my-plugin.php” file, define the header information for your plugin. For example, the plugin name, description, author, and version information.
- Hook into the
activate_pluginanddeactivate_pluginactions to perform necessary setup and cleanup tasks. - Include the other plugin files required for the admin options page, scripts shortcode functionality at the bottom of this file.
<?php
/*
Plugin Name: My Plugin Name
Description: Description of my plugin.
Author: My Name
Version: 1.0
*/

register_activation_hook(__FILE__, 'my_plugin_activation_function');
register_deactivation_hook(__FILE__, 'my_plugin_deactivation_function');

function my_plugin_activation_function() {
  // Perform activation tasks here
  // This can be any setup tasks that your plugin should perform when it is activated
}

function my_plugin_deactivation_function() {
  // Perform deactivation tasks here
  // This can be any clean-up task that your plugin can perform once deactivated
}

require_once(plugin_dir_path(__FILE__) . 'admin/options-page.php');
require_once(plugin_dir_path(__FILE__) . 'includes/scripts.php');
require_once(plugin_dir_path(__FILE__) . 'includes/shortcodes.php');
Step 3 : Admin options page (admin/options-page.php)
- Next, we will create a basic options page that can save ONE piece of text to the WordPress database using the WordPress Settings API.
- We add a single text field and a save button to save the text with the
register_setting()andadd_settings_field()functions.
<?php
function my_plugin_options_page() {
  // Create the options page HTML
?>
  <div class="wrap">
    <h1>My Plugin Settings</h1>
    <form method="post" action="options.php">
      <?php settings_fields('my_plugin_options_group'); ?>
      <?php do_settings_sections('my_plugin_options_page'); ?>
      <?php submit_button(); ?>
    </form>
  </div>
<?php
}

function my_plugin_settings_init() {
  // Register settings
  register_setting('my_plugin_options_group', 'my_plugin_option_name');

  // Add sections and fields
  add_settings_section('my_plugin_options_section', 'General Settings', 'my_plugin_section_callback', 'my_plugin_options_page');
  add_settings_field('my_plugin_option_name', 'Option Name', 'my_plugin_option_name_callback', 'my_plugin_options_page', 'my_plugin_options_section');
}

function my_plugin_section_callback() {
  // Handle any callback if needed
}

function my_plugin_option_name_callback() {
  // Output HTML for the field
  $option_value = get_option('my_plugin_option_name');
  echo "<input type='text' name='my_plugin_option_name' value='$option_value' />";
}

add_action('admin_menu', 'my_plugin_add_admin_menu');
add_action('admin_init', 'my_plugin_settings_init');

function my_plugin_add_admin_menu() {
  add_options_page('Your Plugin', 'Your Plugin', 'manage_options', 'my_plugin_options_page', 'my_plugin_options_page');
}
Step 4 : Enqueue scripts (includes/scripts.php):
- Next, we will need to enqueue our plugin’s Javascript and CSS files, if any. This ensures that when our plugin is activated, the scripts and styles will be activated and vice versa.
- Create a function to enqueue external JavaScript files and a CSS file for your plugin.
- The external.js file can be any external libraries that your plugin depends on.
<?php
function my_plugin_enqueue_scripts() {
  // Enqueue external JavaScript
  wp_enqueue_script('my-plugin-script', 'https://example.com/external.js', array(), '1.0', true);

  // Enqueue CSS file
  wp_enqueue_style('my-plugin-style', plugin_dir_url(__FILE__) . 'css/style.css', array(), '1.0', 'all');
}

add_action('wp_enqueue_scripts', 'my_plugin_enqueue_scripts');
Step 5 : Shortcode (includes/shortcodes.php):
- Next, we want to create a shortcode function that outputs the desired plugin JavaScript and HTML code on our pages or posts.
- In this step, we named our short code as “my_plugin_shortcode”. You can however call it anything you like. This shortcode name will be used to display your plugin content later.
- The plugin will also enable you to pass a “text” attribute as a default. The default text will appear if you did not save any text via the settings API. More on this later.
<?php
function my_plugin_shortcode($atts) {
  // Extract the "text" argument from the shortcode attributes
  $atts = shortcode_atts(array(
    'text' => 'Some Default Text',
  ), $atts);

  // Output JavaScript code with the provided text
  ob_start();
?>
  <script>
    // JavaScript code here
    var text = "<?php echo esc_js($atts['text']); ?>";
    console.log(text);
  </script>
  <p class="my-plugin-para">
    <?php
        $my_plugin_option = get_option('my_plugin_option_name');
        if ($my_plugin_option != ''){
            // echo the text set in the option
            echo $my_plugin_option;
        }else{
            // echo the default text
            echo $atts['text'];
        }

    ?>
  </p>
<?php
  return ob_get_clean();
}
add_shortcode('my_plugin_shortcode', 'my_plugin_shortcode');
Step 6 : The plugin’s style file (includes/css/style.css):
To round up the coding part of the work, we will add a basic style to the plugin – a yellow box encapsulating the line of text output by the plugin. Let’s add the CSS:
.my-plugin-para {
  padding:10px;
  background:yellow;
  color:#000000;
}
That’s it. We are ready to test this plugin!
Step 7 : Uploading the plugin directory to “wp-content/plugins/” directory
This step may differ depending on your setup. So I will not delve deep into this. Upload your “my-plugin” directory to the “wp-content/plugins/” directory. Done? Let’s test!
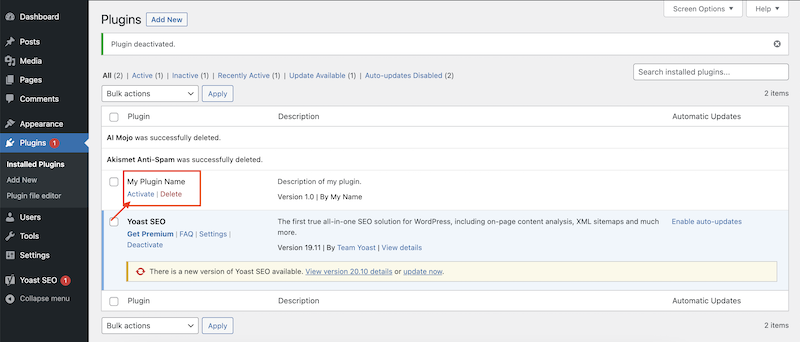
Step 8 : Login to your WordPress admin and activate plugin
Go to your “Plugins” menu and activate your plugin. Notice that the name, description, version and author information that you set up in step 2 is displayed on this page.
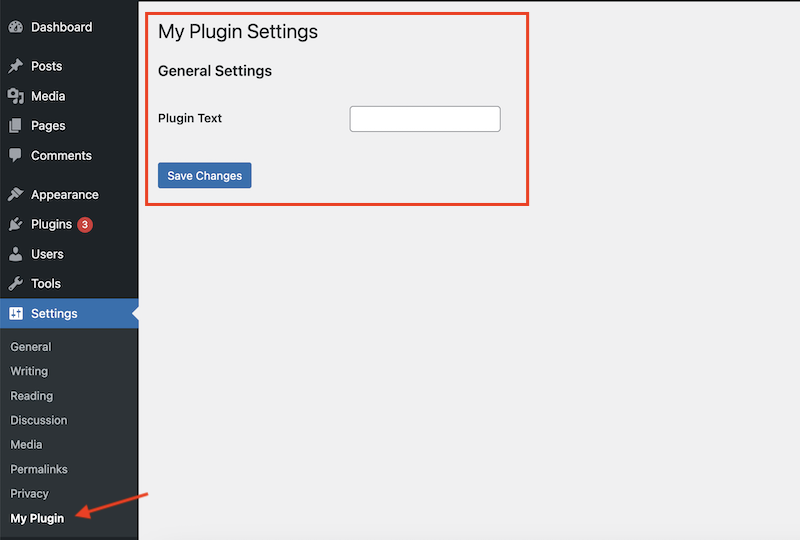
Step 9 : Go to your plugin’s option settings page
To recap, we created a single field to store our plugin text in step 3. Let’s visit that page now. In your WordPress Admin, on the left column, click on “Settings”, and then “My Plugin”. This is where your plugin’s option page entry point is when we set that up in step 3. In the “Plugin Text” field presented on the page, try typing in “This is my plugin!” and click “Save Changes”. Your text should be saved.
Step 10 : Setting up the shortcode
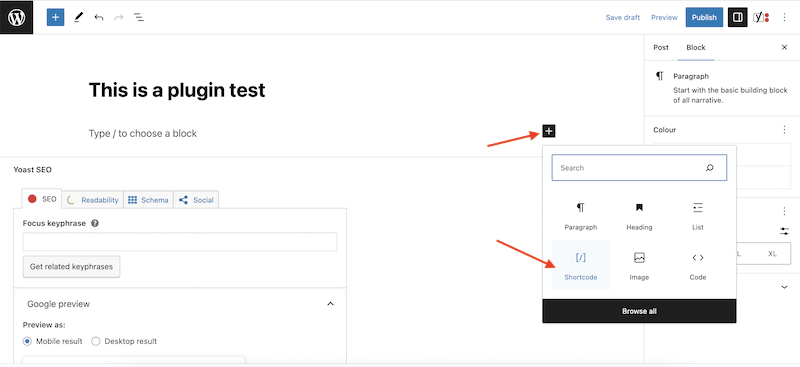
A shortcode is simply a custom WordPress tag that can display content from a plugin or theme. It puts the control of where to display the content in the author’s hands since shortcodes can be placed anywhere on a page or post. Let’s test our example. Go to the WordPress Admin “Posts” menu, and create a new post. Give it a title. I’ll call mine “This is a plugin test”.
Next, on a new block, click on the “+” and select “Shortcode”.
Add in your plugin shortcode. Recall that we named it “my_plugin_shortcode” in step 5. You can always name it more intuitively to suit your needs. Using square brackets, we will put in our shortcode like this. Similar to HTML, there is an opening and a closing tag.
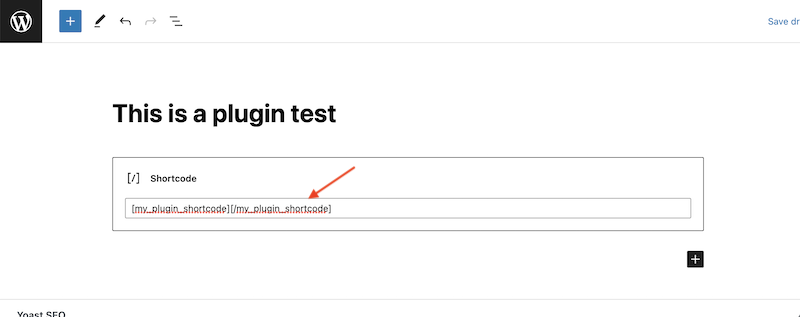
Once done, click on save and go to preview the page. You should able to see your shortcode display in a yellow box (see the CSS set up in step 6) on your post!
Now, one last thing…go back to your plugin’s “Settings” and remove the text that you saved earlier. Then, go back to your post page. The default fallback text “Some Default Text” set on the shortcode in step 5 should be displayed.
That’s all! You can find the complete source code for this tutorial on Github.